|
Content: Expert's examination of genuineness
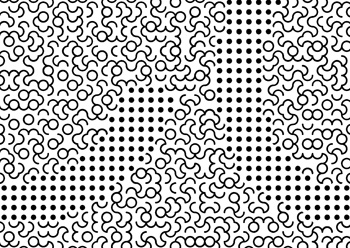
The software product is designed for formation backgrounds of printed forms with the effect of toning of latent images on copying. The program creates a neutral background to be printed on a printed form. The printed form may be printed at a printing-house or by an office printer. While copying such a form, the latent image becomes visible. Many modern copying devices can make copies with the minimum difference from the original and the latent images are toned on such copies faintly. Nevertheless, the security features operating in accordance with the said principle are used for all securities, including token money. In addition to the effect of toning of latent images, a generated background includes a unique pattern that never appears on a repeated generation. This circumstance enables to inspect genuineness on the level of expert's examination and to discern the original from a falsification (even of a professional quality) with a high probability. Generation of a unique pattern means that another user having the same software will not be able to make the same model of a printed form.
The possible mostly spread methods of printing include: offset printing, flexography, digital printing, and an office printer. The most preferable is offset printing and the worst version is an office printer. For encoding a latent image, the background is divided to zones with different micropatterns. On copying, inevitable changes of the micropattern take place. It is required to ensure a different character of such changes that will result toning of the latent image.
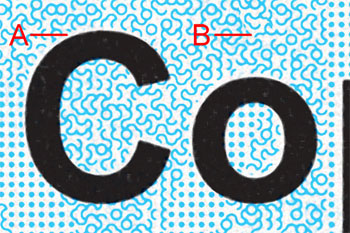
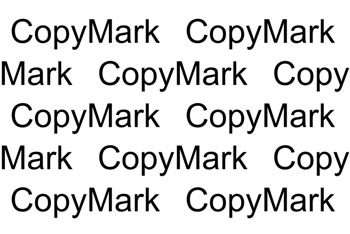
Expert's examination of genuineness. A background generated by the program included a unique pattern. Each square inch of the background with the pattern includes 8000 elements and each element is turned in one of four directions. The probability of an accidental coincidence of 5x5 cm fragments is 1/100000. For examination of genuineness, a magnifying glass or a contact microscope is sufficient. The pattern of the specimen and the one of the original standard shall be compared in several chosen points. Carrying out the comparison is most convenient in corners or close to images of other objects. If an experienced counterfeiter is aware of this circumstance, he may repeat a part of the pattern in such points manually. So, striving for a reliable examination, a random section, for example, in the distance of two centimeters from the top and three centimeters from the left, should be chosen. To ensure a higher level of protection, a document should be printed in two colours or more. For example, print the unique pattern with a latent image in blue colour and the text over it - in black colour (overprint). A counterfeiter will not be able to get the pattern under the black letters. If on subsequent printings, the pattern will not be placed under the black letters, gaps (to be controlled under magnifying) will appear at the letters. Please, compare the enlarged fragments of the original document and its copy:
The procedure of working with the program Installation of the program occurs in automatic way on an activation of the setup file. The program is activated by entering the license code issued by the supplier.
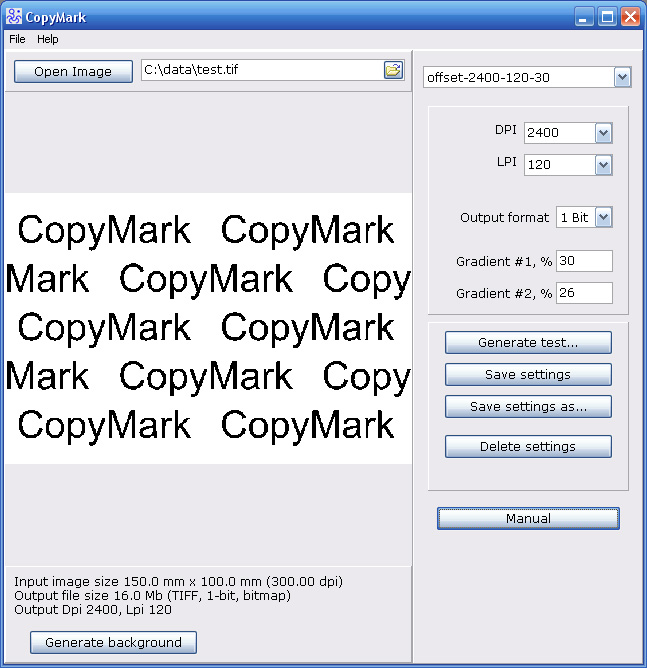
The menu of settings is shown in the right part of the interface of the program.
First of all, the value of DPI parameter shall be entered. You'll must to get to know the precise value of it for the used printing equipment. For offset printing and flexography, it usually varies between 2000 and 5000. For digital printing it is no less than 600. Then set the output format - 1 bit/8 bit. This parameter depends on the method of printing as well. For offset printing, flexography and laser printers it equals to 1 bit. For digital printing and inkjet printers it equals to 8 bit. Some digital printing machines can print with a higher resolution in the mode of 1 bit - this mode is more preferable. Some digital printing machines can print in the modes of 4 bit or 6 bit - for such machines, the setting of 8 bit is used. Then select the value of LPI from the offered list. The higher resolution of the printing equipment allows setting a higher value of LPI. The optimum value for obtaining the effect that "expresses itself on copying the image" is 100-150 LPI. Then the test for determination of the optimum combinations of gradients shall be printed (the button "Generate test"). Generation of the test may take from some minute to one hour dependently on the set parameters and the operating speed of the computer. Usual works will be generated much more rapidly. The generated file of the test shall be printed according to the instructions provided in the chapter "Printing". For printing, sheets of A4 format are required.
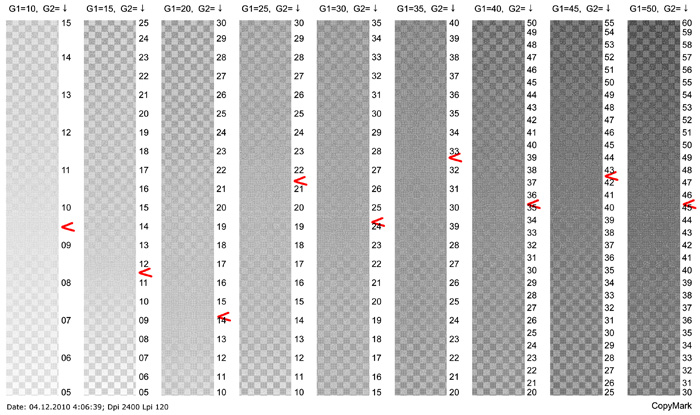
The test enables choosing the required intensity of colour and combination of gradients that ensures invisibility of the latent image. The printed test includes nine columns differing in tone colours. Each column is filled with small squares placed chequerwise. The positions where the tone colours of squares are the same and visually indiscernible shall be marked. If the set value of LPI was too high for the specific printing machine, the quality of printing of lighter columns may be poor. Parameter G1 (gradient #1) identifies the intensity of colour, and parameter G2 (gradient #2) is chosen according to the results of the test. The chosen combination of the gradients should be specified in the menu of the settings of the program. In the technical aspect, the optimum value of G1 is 35%. Parameter G2 can be specified with 0.1 percent accuracy, for example, 31.2. The button "Save settings" saves all entered parameters of settings. The button "Save settings as" saves parameters of settings under a new name. All saved settings may be called from the list in the upper part of the menu. The button "Delete settings" deletes the current version of the settings from the list. For generation of the background, its layout with a latent image shall be developed. The format of the file - TIF image, the colour model - Grayscale, and the recommended resolution is 300 ppi. The file should be free of supplemental layers and compression. An example of creating of a layout: Let's suppose that you need 10x15 cm background. Create a new image of the same size in any graphics editor. Choose the white colour for the background. On the background, place black inscriptions or other images to be toned on copying. Use the black and white colours only. Save your image.
If a document is to be printed by an office printer or another printing machine of a low resolution, a white text on the black background should be chosen. Press the button "Open image" and load the prepared layout with the latent image. The image also can be transferred to the operational field of the program by the mouse. The loaded image will appear in the preview without halftones, i.e. identical to the latent image to be toned. Choose the required version from the list of saved settings. Press the button "Generate background" and specify the name of the file under saving. Wait until the completion of generation of image. The generated background can be imported to a layout of any graphics editor (Adobe Photoshop, Illustrator, InDesign, PageMacker, Corel Draw, Quark, Macromedia FreeHand and others). The image cannot be deformed (compressed or extended); it can be turned to 90 degrees only. The colour of the background can be replaced for a colour with 100% filling. For example, black colour can be replaced for CYAN-100% or Pantone_Green-100%, if such ink is used in printing. On printing documents, usually less contrasting colours, such as orange or grey, are used for such patterns. If less contrasting colours are used, the optimum value of the gradient #1 = 35% is set and the background is not too dark. During the process of image setting for offset or flexographic printing, the option of automatic downsampling of the resolution for the image should be switched off. The same requirement is applicable to saving the layout in PDF or PostScript format. For printing by digital machines, rasterizing should be switched off (for example, "Screening - OFF" or "LPI - none"). The quality of printing can be inspected using a magnifying glass or a contact microscope by comparing with the enlarged image of the generated background on the computer's monitor. If the printed image differs (the forms of elements of the pattern are distorted or moiré appears on the background), check up carefully whether the above-mentioned requirements were satisfied. |