|
Laser pointer and camera stabilizer test
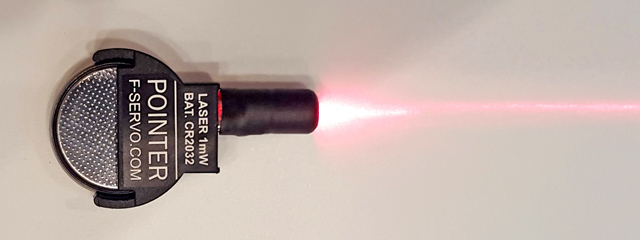 Weight - 6g including CR2032 battery, radiation - 1mW. 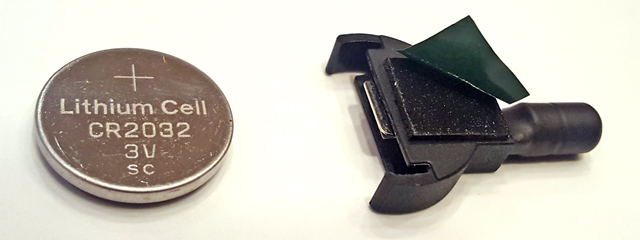 Laser pointer allow to find and compare a real accuracy of the stabilizer. As a matter of fact, the real accuracy of some popular stabilizers is one hundred times worse than declared in manual. 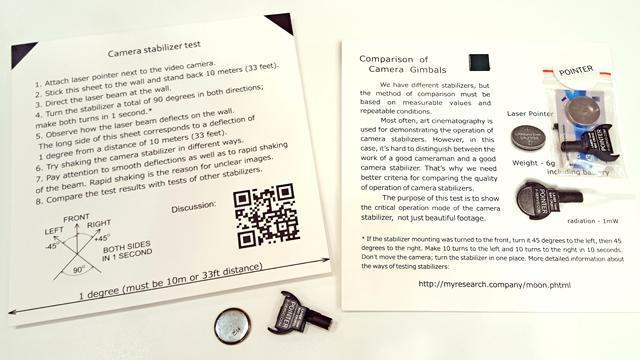 > Download printable manual Testing the accuracy of camera stabilizers by using the moon
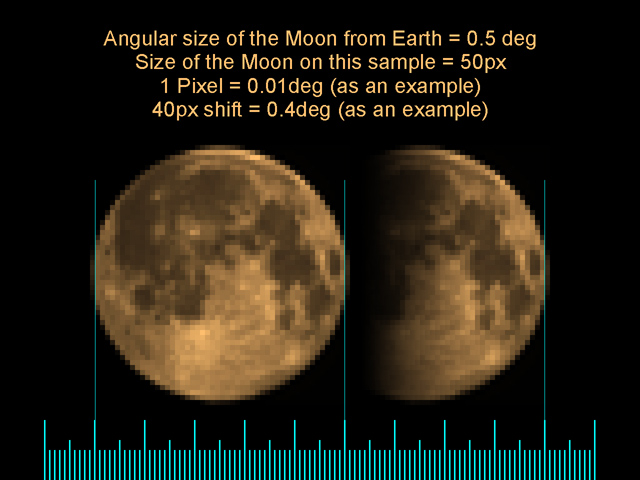
Most often, art cinematography is used for demonstrating the work of such devices. However, in this case, it's hard to tell the proper work of a stabilizer apart from the work of a good cameraman. That's why we need better criteria for comparing the quality of work of camera stabilizers. This is an important factor when choosing a model and when trying to detect device defects. If the mechanism is dirty and the axes aren't rotating properly, this can be fixed. But first of all, you should find out whether your suspension is working worse than others’ designs. I suggest using the Moon as a universal object for testing such devices. The sequence of actions for comparative testing of video camera stabilizers. The best time for a test is a night with a full moon. Use a long lens (zoom lens). The use of an optical or digital stabilizer is not allowed. 1. Point the camera at the Moon with max zooming. 2. Tilt the gimbal 45 degrees forward, then 45 degrees backward and repeat it 5 times over 5 seconds. 3. Turn the gimbal 45 degrees left, then 45 degrees right and repeat it 5 times over 5 seconds. 4. This was a test of the stabilizer during fast tilting. 5. Slowly (under 5 seconds) tilt the suspension mount back and forth, then slowly turn left and right. 6. This was an accuracy test for the position controller. 7. Enable recording for 1 second. Leave the suspension motionless for 10 minutes. Again, enable recording for 1 second. There must be any still remote object besides the Moon or instead of the moon in the frame. 8. That was a slow drift test. 9. Disable software limitations on the speed of rotation. Run the camera rotation command and make a quick stop. This test should be filmed with an additional side camera or in front of a mirror. 10. It was a motion speed test. We can quickly compare the efficiency of different stabilizers by looking at how the image of the Moon shifts in the frame. More accurate analysis requires a video editor and a graphic editor. We need to measure the size of the Moon in image pixels. If it’s too difficult for you, measure it on the screen using a ruler. The size of the Moon is 0.5 degrees. You can now calculate pixels or use a ruler to set the camera stabilizer variation threshold. You will need to cut three video segments with camera controlled rotation in a video editor. The first fragment shows the camera going from standstill to max rotation speed. The second fragment lasts shows the camera rotating at max speed. The third one shows it going from max rotation speed to rest again. Assess the angle that the camera turns at in each of the videos. The duration of the fragments lets you estimate the performance of the camera in controlled rotation. Why the Moon? Because its visible arc size is the same in every corner of the world: from 29′24″ to 33′40″. The Moon is a nominally infinitely distant object and that is why hand shaking does not affect the accuracy of measurement using a trig function. You can use the sun as an orienting point, but this will require an ND1000 filter to be installed on your camera. Why -45 to +45 degrees? Because these positions are perpendicular and it’s easier to notice visually. Why 5 seconds and 5 tilts? Because it recreates extreme conditions. 5 tilts in a row give you a more accurate period of vibration. Why are there no tests with sideway tilting? Because it cannot be detected as a sideway deviation of the Moon. For this purpose, you can shoot any other objects and measure the change of tilt in the video using an angle protractor. However, this measurement will not be accurate. Why an additional object in the drift test? Because the Moon slowly moves. For accurate measurements, you need to use a laser pointer that is installed near the camera. When a laser is used, the stabilizer cannot be moved sideways. If you hold it with your hand, deviation measurement using a laser does not produce an accurate result. If the drone flies smoothly or the operator moves the camera carefully, it's hard to assess the work of the stabilizer. However, if the operator stumbles or starts to dance, its efficiency will be clearly visible. Short rules 1. The method of camera mount swaying must be clearly visible and reusable by others. 2. The critical level of camera vibrations must be clearly visible. 3. It is imperative that the camera films the moon or the angular size of objects is defined otherwise. 4. The purpose of the demo is to show the critical stabilizer operation mode, not just beautiful footage. Samples
There is a thread on the RCGroups forum that discusses the results of these tests |